On my project at work we recently upgraded our TFS 2013 on-premise installation to TFS 2018 and I am loving it. I got to play around with build and release definitions and we set up pipelines for most of our applications. We could finally automate everything that should be automated. After seeing the results of this I wanted the build definitions to also run the unit tests for the respective projects. We were able to set this up for most of our projects, but I was struggling with a specific problem: how to get our unit tests to run on our Mac agent.
We have a Xamarin application (iOS and Android) which has some unit tests for the shared code used between the iOS and Android application. The problem was that Mac as a build agent does not have the VSTest capability which is required to run the unit tests, unlike Windows. This is a problem when you want to build and deploy the iOS application (which has to be done from a Mac) and at the same time run the unit tests. We discovered this obstacle when trying to run our build which contained the Visual Studio Test task in its build definition. So my question was: How can I get our tests to run on both a Mac and a Windows agent? The answer was: convert the test project to .NET Core!
As you may know, .NET Core is a cross platform framework that lets you run your C# code on Windows, Linux and MacOS. By converting the test project to a .NET Core project, I would get access to the .NET Core command line tools from the Mac and thus be able to use the .NET Core task in TFS and run the tests with this.
Step 1: Converting the test project to .NET Core
In order to complete this step you’ll need to have the “.NET Core cross-platform development” workload installed into your Visual Studio installation. You can add it by using the Visual Studio Installer.
To convert the test project I replaced the content of the .csproj file with the following (I added some placeholder code for example purposes):
<Project Sdk="Microsoft.NET.Sdk">

  <PropertyGroup>
    <TargetFramework>netcoreapp2.1</TargetFramework>

    <IsPackable>false</IsPackable>
  </PropertyGroup>

  <ItemGroup>
    <!-- Include your package references here -->
    <PackageReference Include="SamplePackage" Version="X.X.X" />
  </ItemGroup>

  <ItemGroup>
    <!-- Include your project references here -->
    <ProjectReference Include="MyProject.csproj" />
  </ItemGroup>

</Project>
Then I deleted my packages.config file and AssemblyInfo.cs and re-added my NuGet packages and references to other projects.
Step 2: Assessing NuGet packages
Seeing as we use the SpecsFor framework, which in turn uses the NUnit framework, we needed to include the NUnit3TestAdapter NuGet package. Without it, TFS won’t be able to discover the tests. We were also using an older version of SpecsFor that we needed to update, which also prevented the tests from being discovered.
Step 3: Adjusting the build definition in TFS
After verifying that the tests were working by running them through the Visual Studio Test Explorer, I edited the build definition to use the aforementioned .NET Core task instead of the Visual Studio Test task.
The build definition looked like this:
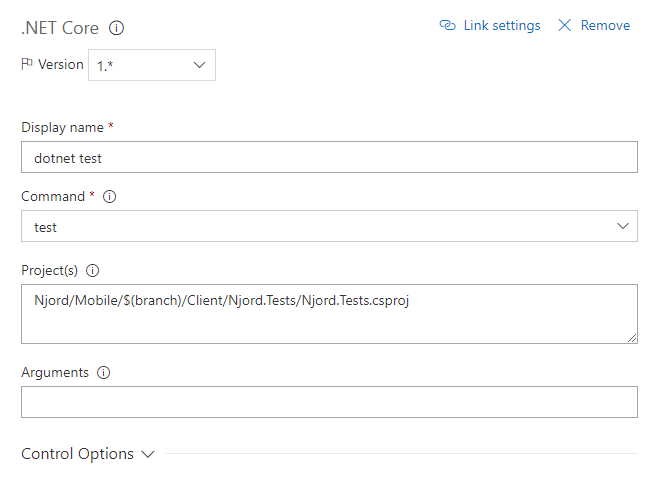
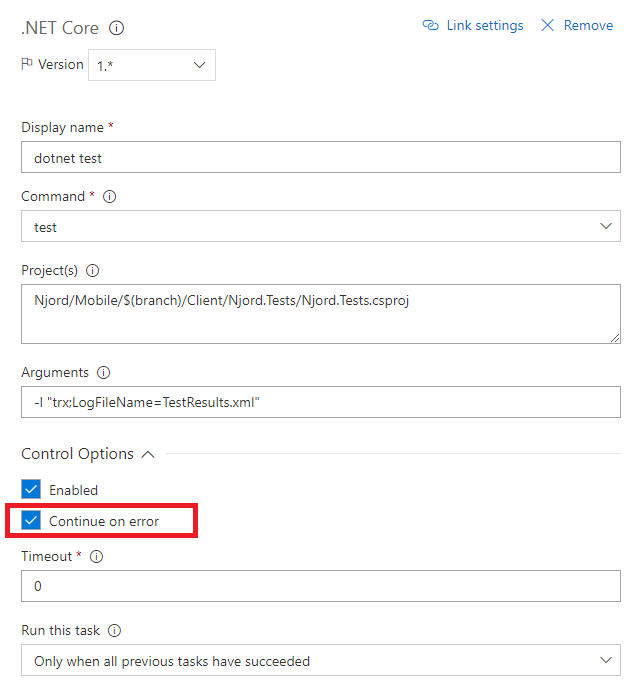
The .NET Core task uses the test command and is targeting the test project’s .csproj file.
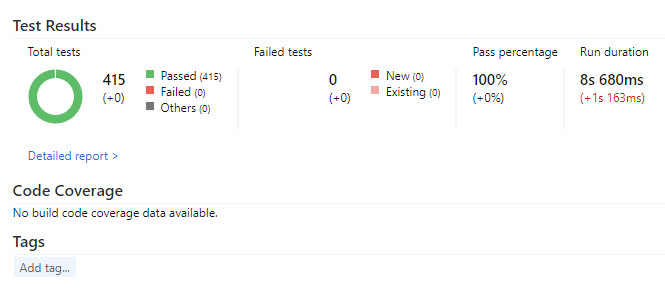
After a suspensful wait for the build to finish, it worked! Although, there was something missing. When you use the Visual Studio test task you get this nice little graph on your build details view in TFS telling you how many tests passed, how many failed and other useful info about your tests. This was missing. The only info I got about our tests now was by checking the build logs. I wanted this to be more visible and maybe even affect if the build would fail or not.
Here’s where some of the frustration of working with an on-premise installation of TFS kicked in. According to the documentation, there should be an option to check “Publish test results”, which should be directly under the Arguments field. However, this is only available in the version 2.* of the .NET Core task (notice how the screenshot above is using version 1.*). In our installation of TFS 2018 Update 2, version 2 is only available as a preview and does not include this checkmark. Sigh.
At this point I’m starting to think all this work has been for nothing. Luckily, I discovered that you can achieve the same thing as this checkmark by adding some arguments to the .NET Core test command:
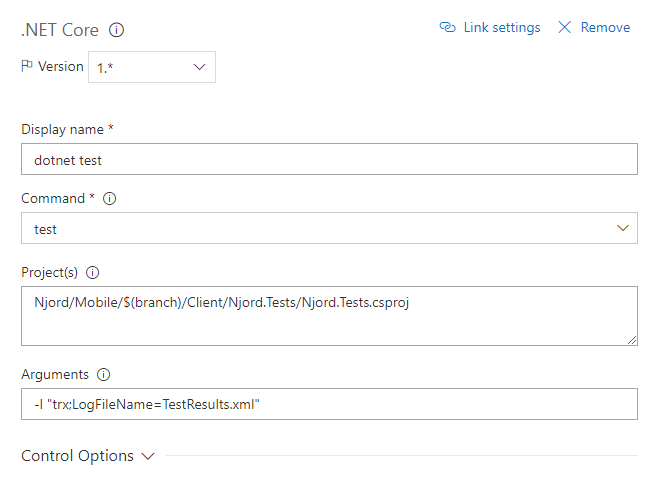
The added arguments tells the task to use the TRX logger, which produces a Visual Studio Test Results File. It also specifies the resulting file name, which will be used in a further step.
Since this task only produces the test results, we also need to publish the generated test results. We did this by using the Publish Test Results task, which is pretty self-explanatory. We set it up like this:
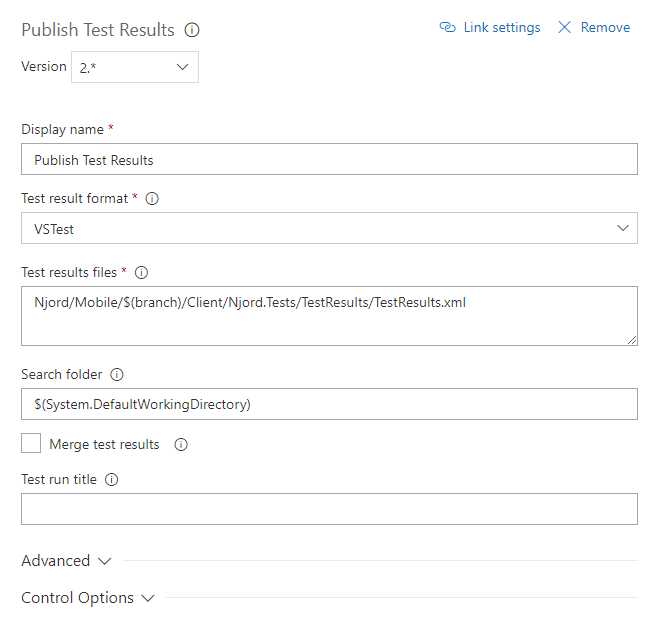
Note how we have selected VSTest as “Test result format”. I was a bit confused by this since NUnit is also an option here, but seeing as we produced a Visual Studio Test Results File in the previous step, this makes more sense. We have also pointed to the produced file in the “Test results files” field.
And presto! The dearly wanted graph was finally there:
As a last modification I wanted the build to proceed, even if some of the tests were failing. At this point the build would break and stop if there were any failing tests in the build. To achieve this, I went back to the dotnet test command step and checked off “Continue on error”. This will mark the build as “Partially succeeded” if there were any failing tests and will be marked as orange instead of red or green. Neat!
Summary
The whole process of getting this to work really increased my interest for DevOps and pipelines. As a developer I always want to automate manually tedious tasks, and as a human I would rather much have a machine remember all the steps involved with builds and releases for me. This is also a great step to assure quality and a big bonus in projects where there aren’t any designated testers.
On a final note: I would love to hear from you if you have done something similar in TFS/Azure DevOps and what your thoughts are on best practice with automated testing. I am also curious to know if the “Publish test results” option for the .NET Core test command is available in later TFS 2018 updates, since it is not on the Update 2 version. So if anyone has the answer to this, please leave a comment.
Hi,
for the ui tests we used a task group made of 3 main tasks
1. build solution Project1_Test/Project1_Test.csproj
2. a shell script that invokes mono to run the tests
mono ../../../../NUnit.Runners.2.6.3/tools/nunit-console.exe Project1/bin/Debug/Project1_Test.dll -xml=UITestResult.xml also with the ‘Continue on error’ flag enabled
3. Publish Test Results in NUnit format and specifying the xml file name
It’s so nice to see the test graph at the end 😀
p.s. last run of the tests was 15.03.2019 something might have been changed in the meantime